Creatio released its new Freedom UI Designer tool to allow users to create fully responsive apps in a drag-and-drop editor without ever having to use code. That’s right, no code! Creatio’s no-code system is a complete platform for automating internal processes and building a responsive layout team’s can use daily.
From the different elements that can be dragged onto the page, to different color schemes that can be applied to each column within a page, system administrators can completely change the the look and feel of their Creatio UI!
While there are many neat new features within the Freedom UI, of my personal favorites are lists.
Lists are powerful! You can them in many ways. From the ‘list’ view of a selected object, you can connect all associated objects and view from one single record using pre-configured filters. Here are two use cases of when a list can be used in Creatio’s Freedom UI, and how to add it to your page.
Use case #1: Viewing all associated Contacts within an Account
Whether it is one single contact or multiple contacts associated with a company, a Creatio user may want a quick view of which contacts are associated. Instead of using the global search to search for every single associated contact, you can simply access all associated contacts directly from one screen via Lists.
Think about the type of list you wish to see. Is your list static? Or, should it be a dynamic list that can change as information is updated? , Do you want your users to manually add contacts directly within this view?
In this example, I’d like my users to be able to add additional Contacts to a single account record, whether manually or via the import Wizard. Here’s how we would set that up:
Step #1: Access your [Accounts] form page via Application Hub. Then, Drag the [Expandable List] element onto your page.
Step #2: Select the [Contacts] object. Remember, if you have multiple different contacts pages, define which ‘page’ you wish users to use.
Using the columns, you can select any column that should be displayed within this list view. Even though the users can still add/remove columns, what you configure within the Designer will be considered the ‘Default view’.
Step 3: Now, it’s time to configure our action buttons.
Select the [+]. By default, the [Open New Record] page is selected. However, you must define which page you wish to open. In our case, we would want the users to be able to add a new contact.
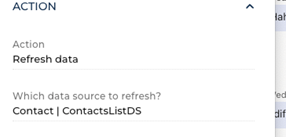
Using the [Refresh] symbol, select the contacts list you wish to refresh when an end-user selects this button. If you have multiple Contact objects within your layout, you must define the specific list you wish to refresh. By selecting the object, you can view the list code underneath [Advanced]. In this example, we wish to refresh the [ContactList] list.
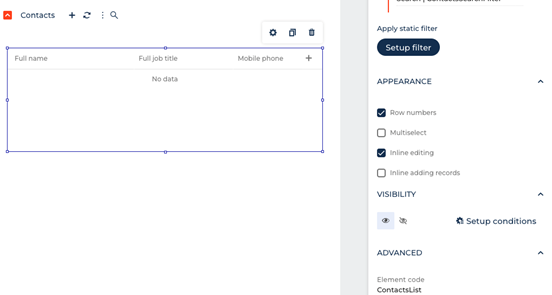
Using the Ellipses, you can select and configure your own ‘action’ items. For instance, do you want to give the user the ability to ‘export a list’, import a list, or print a report? Whatever action you wish to give users, you must configure these actions, like the image above.
In this use case, I will configure exporting and importing abilities.
Under [Menu Items] Select the [+] and name your action.
Under [Action] select the action you wish to display.
Step #4: After configuration, you still need to filter the list to only display contacts that are associated with the account page you are on.
Using the [Apply filter by page data], Select the [Id] = [Account].
Note: if you do not add this filter to your lists, it will display all records within that object.
Once completed, Save the page layout. You can now see a list of all contacts associated to the account.
Use Case #2: Parent-Child Relationships
Another great example of when to use a list in Creatio’s new Freedom UI is when your business uses parent-child relationships. In Creatio, you may want to assign aa parent account to another account. By default, Creatio has this feature built in. However, like our contacts example, we would want to view a list of all our ‘child accounts’ versus searching for each record individually. Here’s how to do that:
Step #1: Access your [Accounts] form page via Application Hub. Then, drag the [Expandable List] element onto your page.
Step #2: Select the [Accounts] object. Remember, if you have multiple different account pages, define which ‘page’ you wish the users to use.
Once you have completed the [Action button] configuration (similar to above) you’ll need to apply your filter.
Under Account, select [id] = [Parent Account]. This will display all records associated with the [Parent Account] lookup.
As you can see, the possibilities with expandable lists are endless. Depending on your use cases, you can configure a pretty interactive layout with a few clicks!
For more information on how to use expandable lists, contact your Technology Advisors success manager.